

How We Leverage Serverless for Backing up Your Posts.
A Story of Implementing GitHub Backups in a Serverless Way With Websockets, Lambda, Sqs.


Table of contents
One of the main value propositions of hashnode is data ownership. With that comes opting out of hashnode. In case you want to leave to a competitor 😢 or to your own blog we want to make it as easy as possible for you. That is why we offer the feature to backup all your posts to GitHub.
This post shows you how we implemented this feature and which AWS services we have used for that.
Feature
Backing up your posts to GitHub is already possible for quite some time. So far, it was only possible for newly created or updated posts. Since opening up the team publications to everybody we want to also give the opportunity to backup all of your old posts.
For this functionality, a simple server with a more or less long-running blocking process wouldn't work as we wanted to. That is why we have decided to use a serverless solution to solve this problem.
This post introduces you to the engineering behind the Backup All My Posts button.
Constraints
When talking about implementing features we always face some constraints. The main ones here are:
- We want to outsource it from our main API
- GitHub commits can not be happening at the same time
- Users should see a loading state of their posts, something like 5/6 backup succeeded.
These are the main constraints to keep in mind. These weren't present from the beginning some of them we more or less learned during development 👀
Architecture
First, let's have a look at the architecture. We have several parts and services included. Our main cloud provider in this case is AWS.
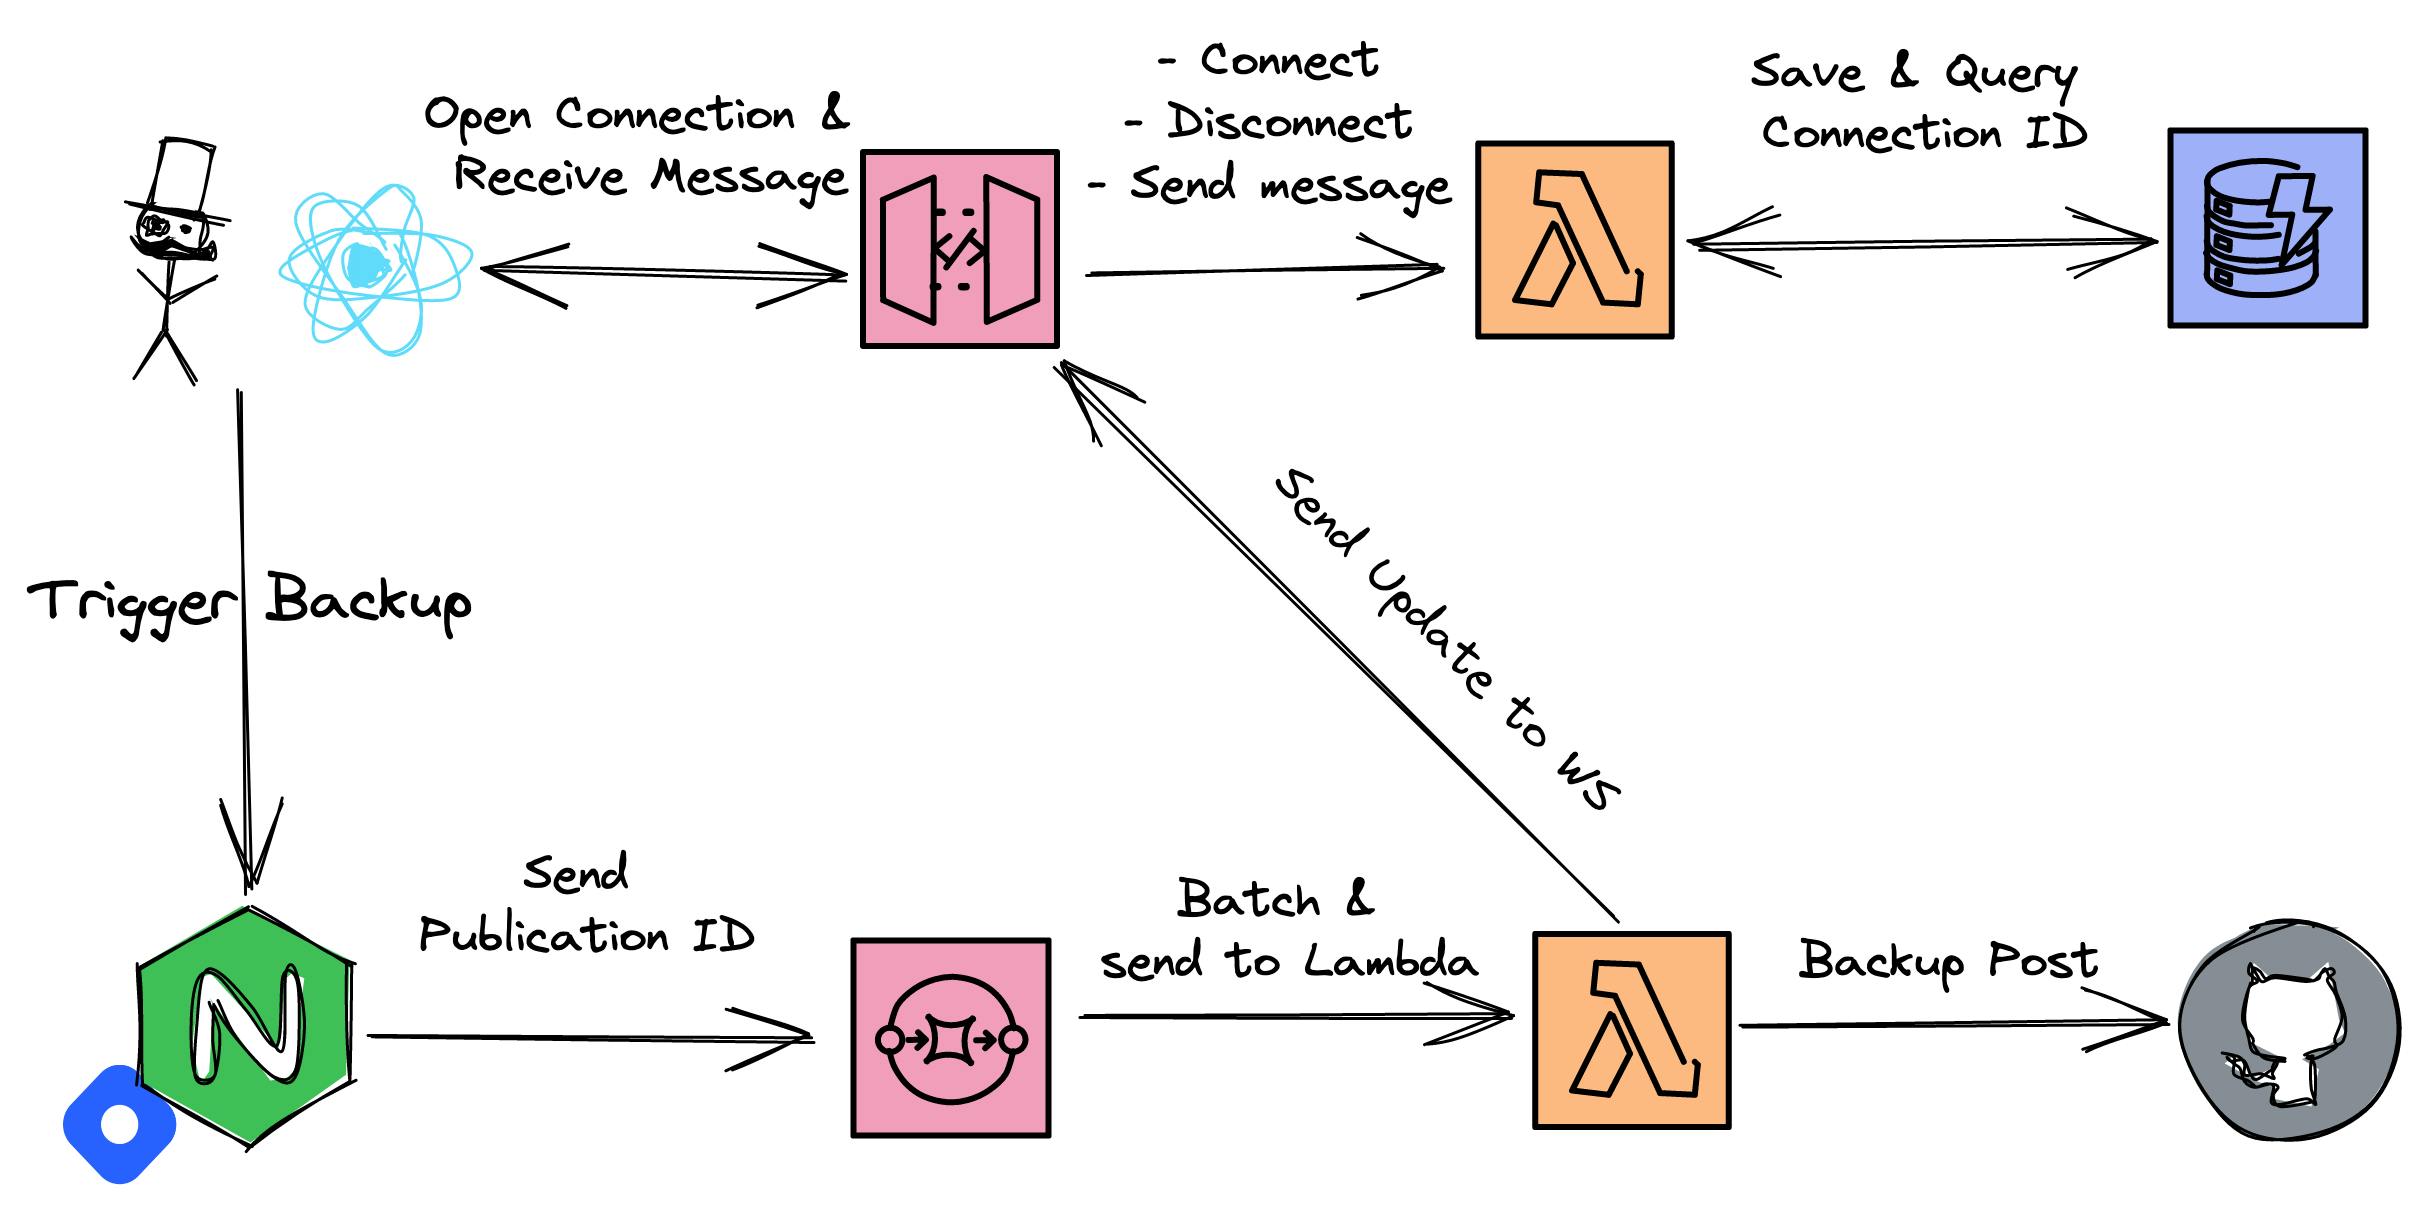
I'll go through all of the involved services and explain simply what the service is responsible for.
Hashnode API
The main API of hashnode runs in a serverless function in Vercel. This API will be triggered once a user clicks on the button Backup All My Posts. This API will simply call a message queue with the publicationId and userId of the user.
Simple Queue Service
SQS is the oldest and one of the most-used AWS services. SQS will simply get a message and forward it to workers. Or to be more concrete workers will poll for new messages. SQS gets a certain event and this event will trigger a lambda function that will execute the actual business logic.
Lambda
Lambda is the OG in serverless services. It is a function-as-a-service and allows executing code without handling infrastructure. This lambda will simply get all posts and backup them. More details later.
API Gateway - Websocket
To be able to communicate with the end-user we need to establish a WebSocket connection. A WebSocket can be understood as similar to a telephone line. You will open a connection between a client and a server and can send messages between them. The connection is supported in browsers by default. Both parties (client & server) can send messages to each other. One handler attached to the WebSocket server is responsible for sending the messages and handling the business logic.
In our scenario, a WebSocket is needed since the whole workflow runs asynchronously.
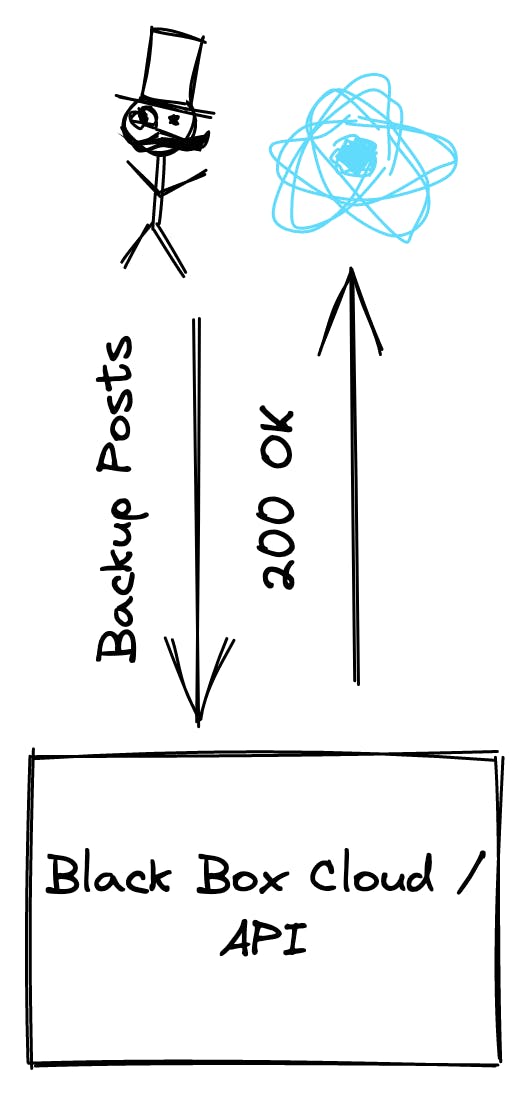
A user simply calls our API and the API returns 200 if the message could be sent to SQS. Then the process is triggered on the side of SQS. But we don't know about the progress.
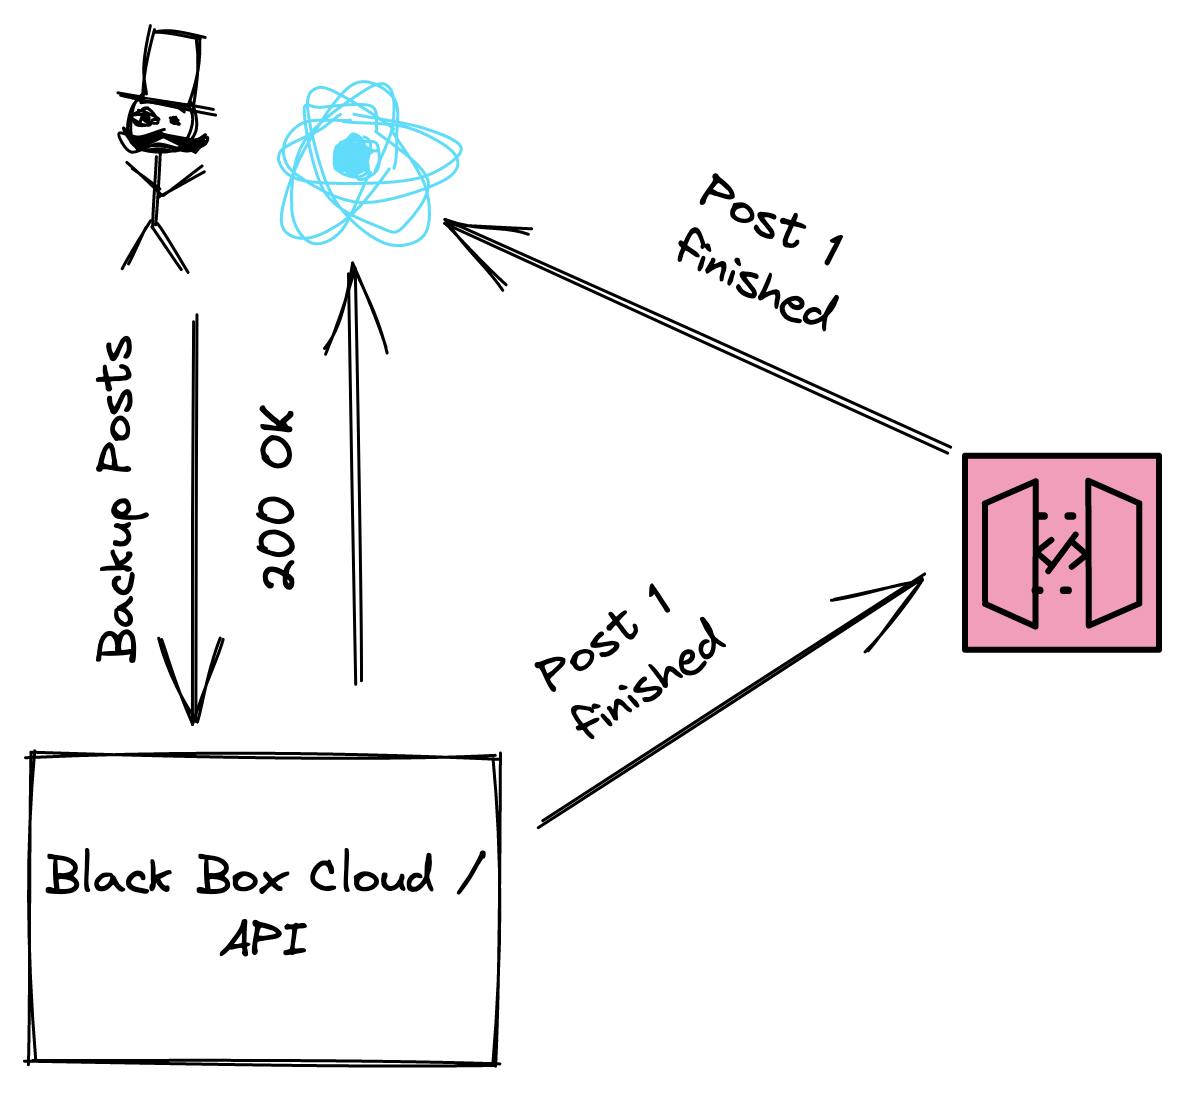
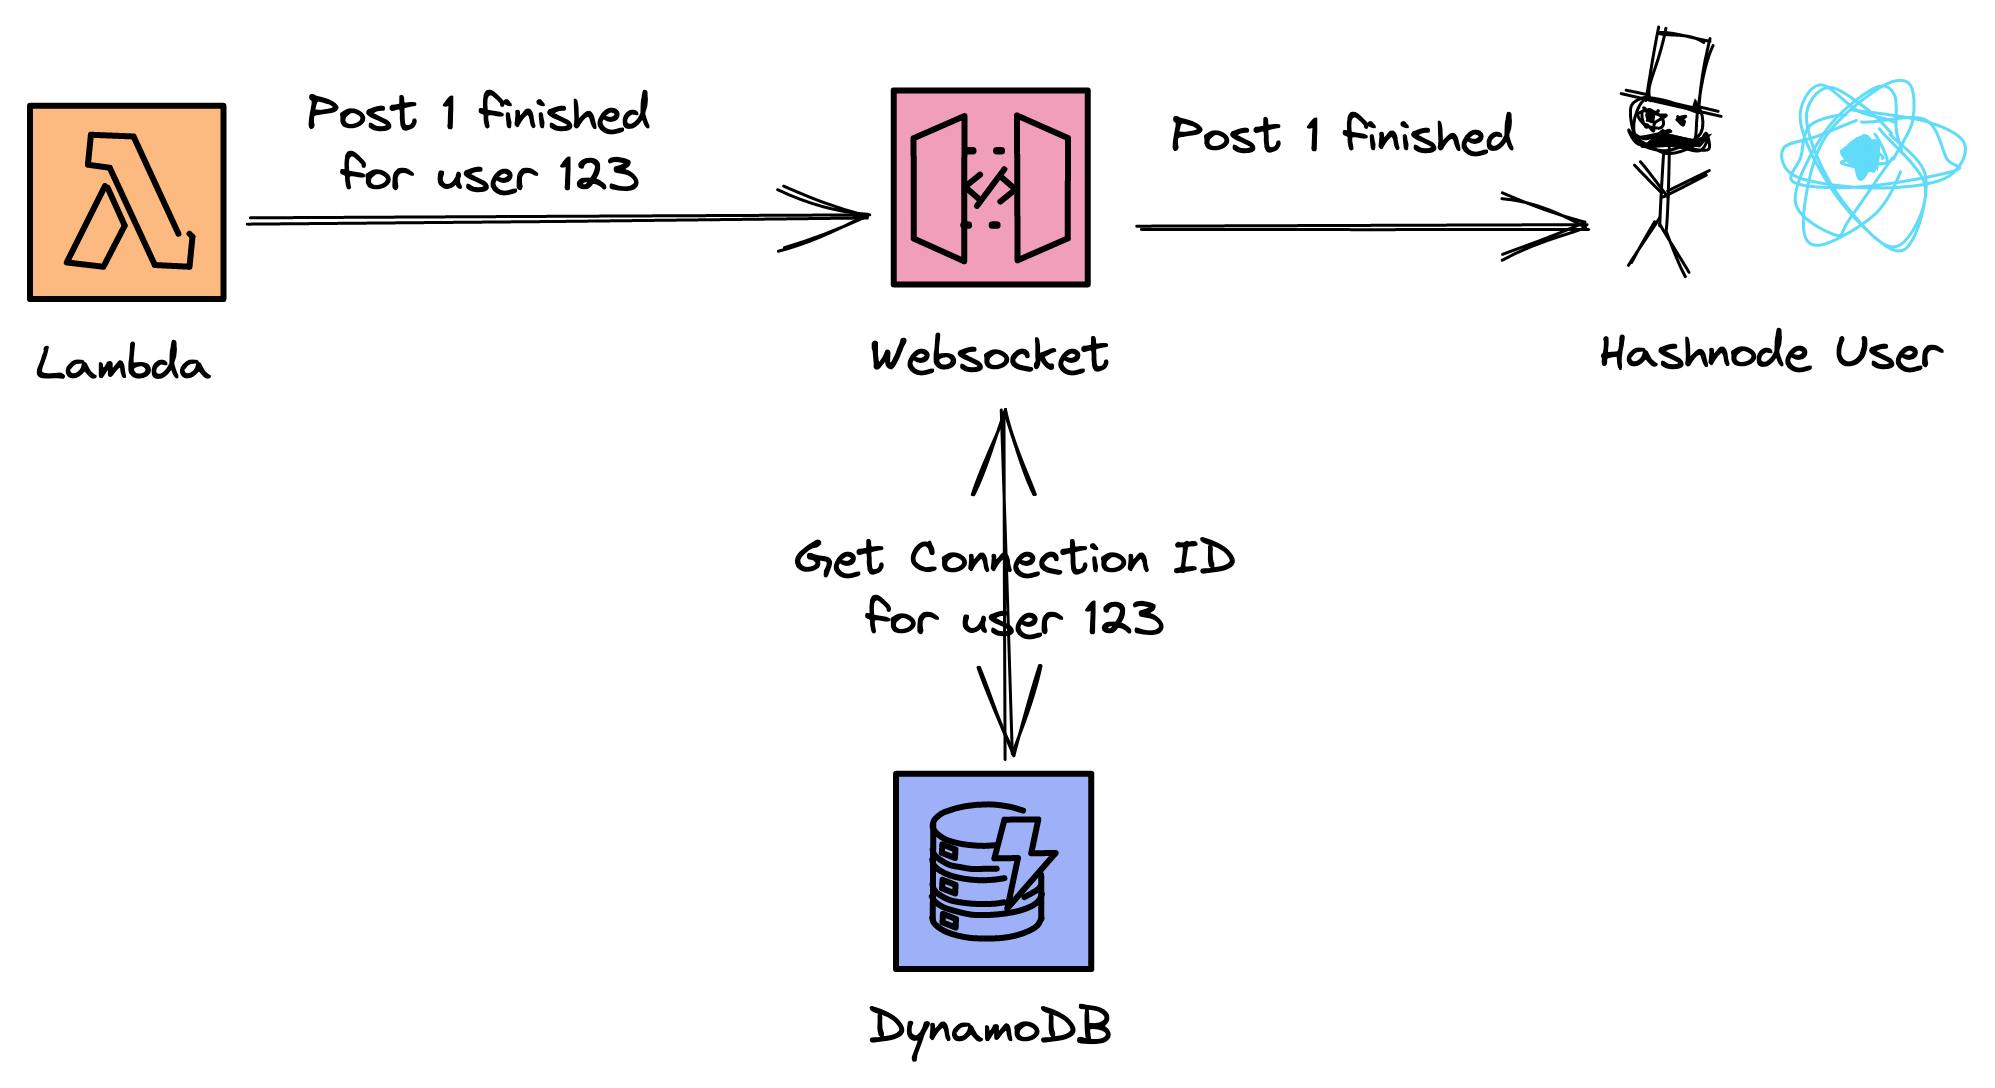
To overcome this issue we add an additional component to the architecture, the WebSocket. The client is connected to the WebSocket in case he visits the page PUBLICATION/dashboard/backup. The lambda sends a message for each finished post and the WebSocket forwards it to the client.
That is how the client gets a progress bar 🥳
DynamoDB - Save connectionId to userId
All of the above components (in AWS) are stateless. What does this mean for our WebSocket? The WebSocket needs to know where to send the message for the progress bar. This information needs to be present from the lambda service since we just send a message to the client in case we finished one post.
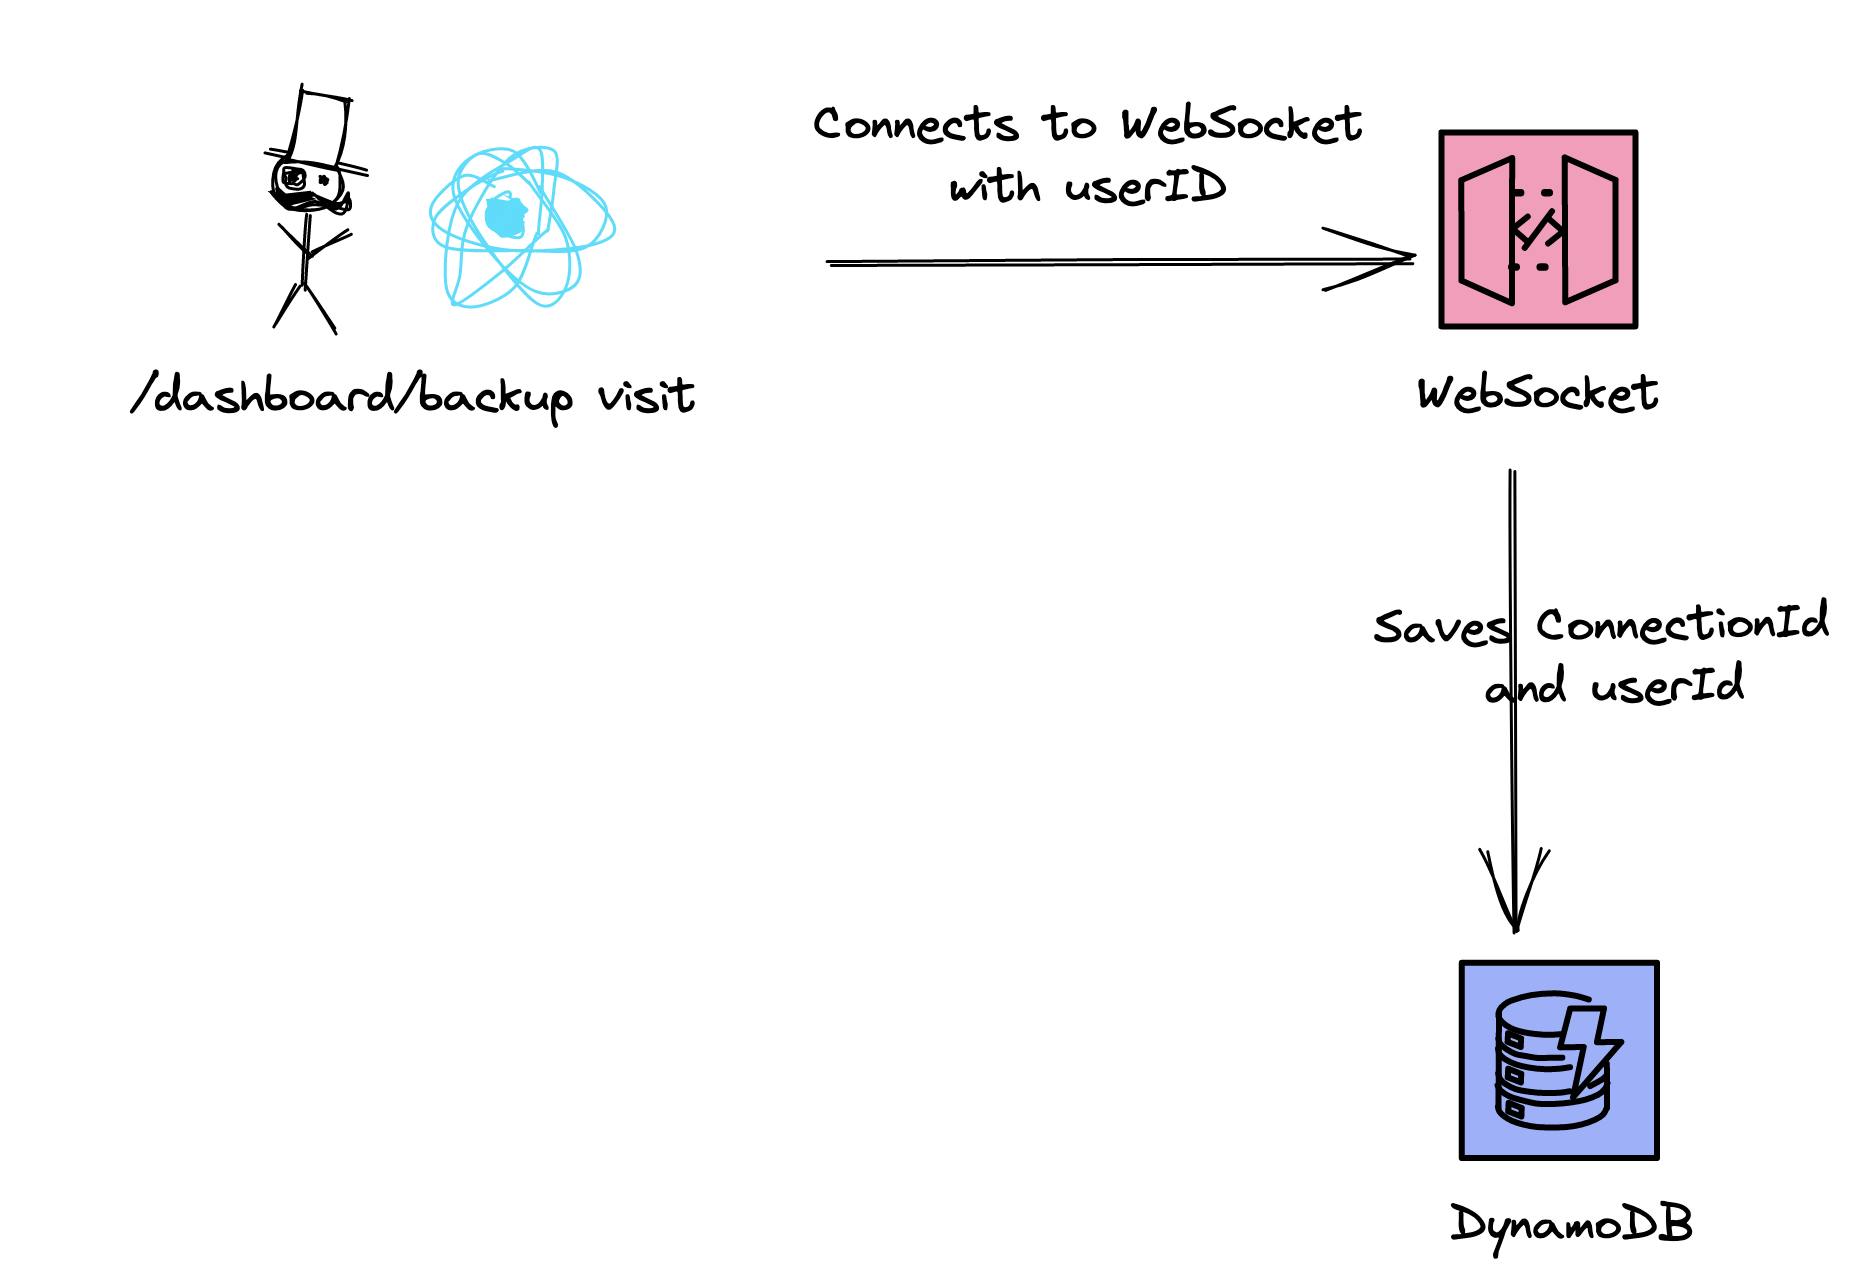
WebSockets have connectionIds for connected clients. Since our WebSocket is serverless & stateless we need to save the connectionId somewhere. For this DynamoDB comes in place. We save the connectionId in our own table in DynamoDB on every connect and remove it for every disconnect.
But the lambda function needs to be able to send a message to the WebSocket and define which user should get this message. Not every user who is visiting the backup page should be informed about that. The lambda doesn't know the connectionId. This is why we save an additional field, the userId. With that, we have a mapping of userId and connectionId.
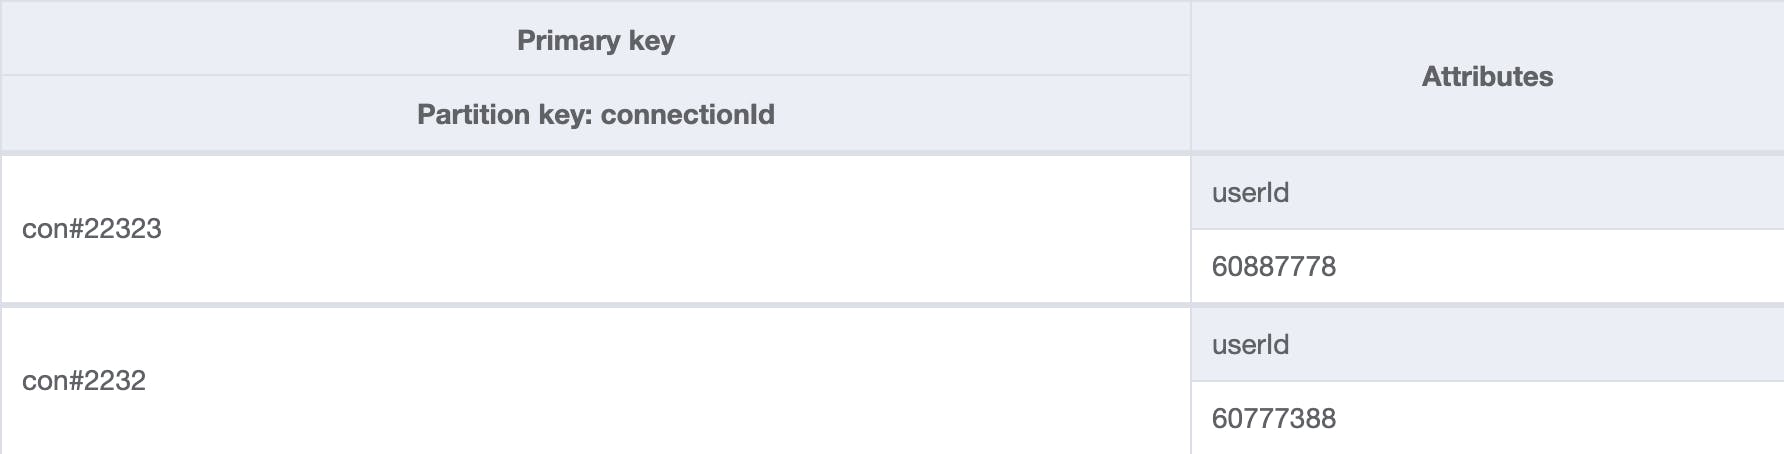
In DynamoDB we can create additional indices for such cases. The connectionId is our primary key, and the userId is our key for the second index. With that we are able to get a connectionId by userId.
The table with the normal primary key looks like that:
The table with the index byUserId looks like the following screenshot:
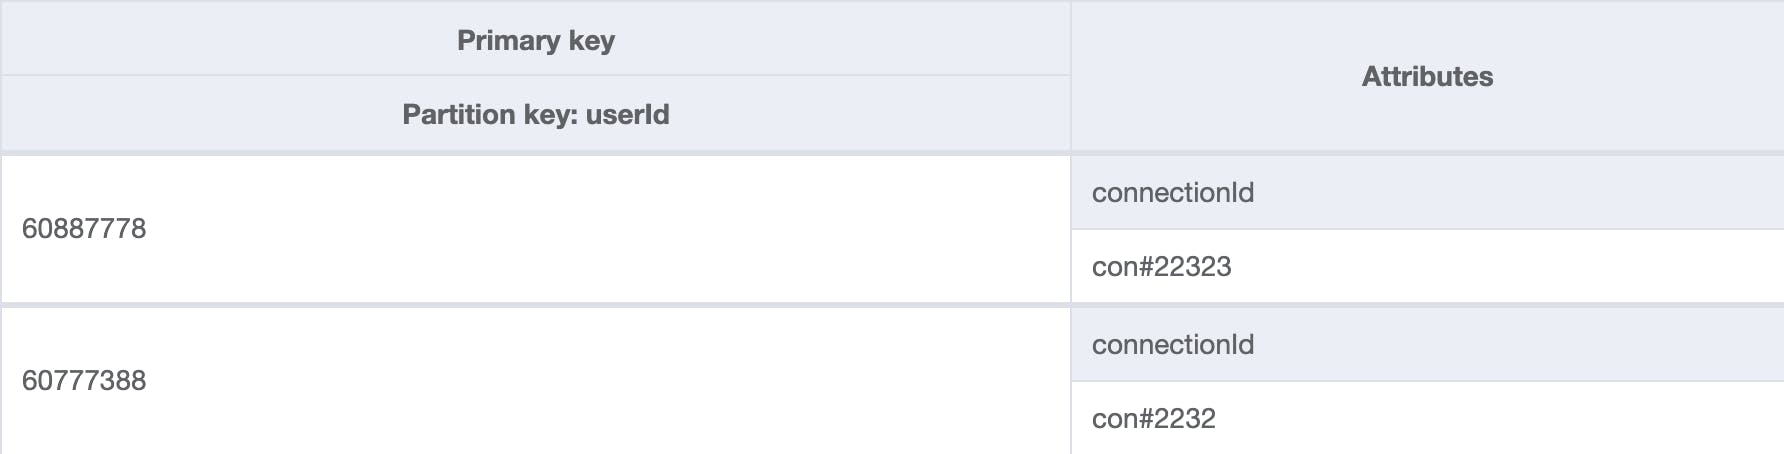
This gives us the opportunity to query data by the userId.
If the lambda now sends a message to the WebSocket it also includes the userId. The WebSocket handler get's then the connectionId and forwards the message to the correct client.
I know, very complex interaction for a simple thing like a WebSocket message.
MongoDB
Finally, we save the state of the post and the backup result in MongoDB. This will be done to simply show a list of success or failure messages in the dashboard.
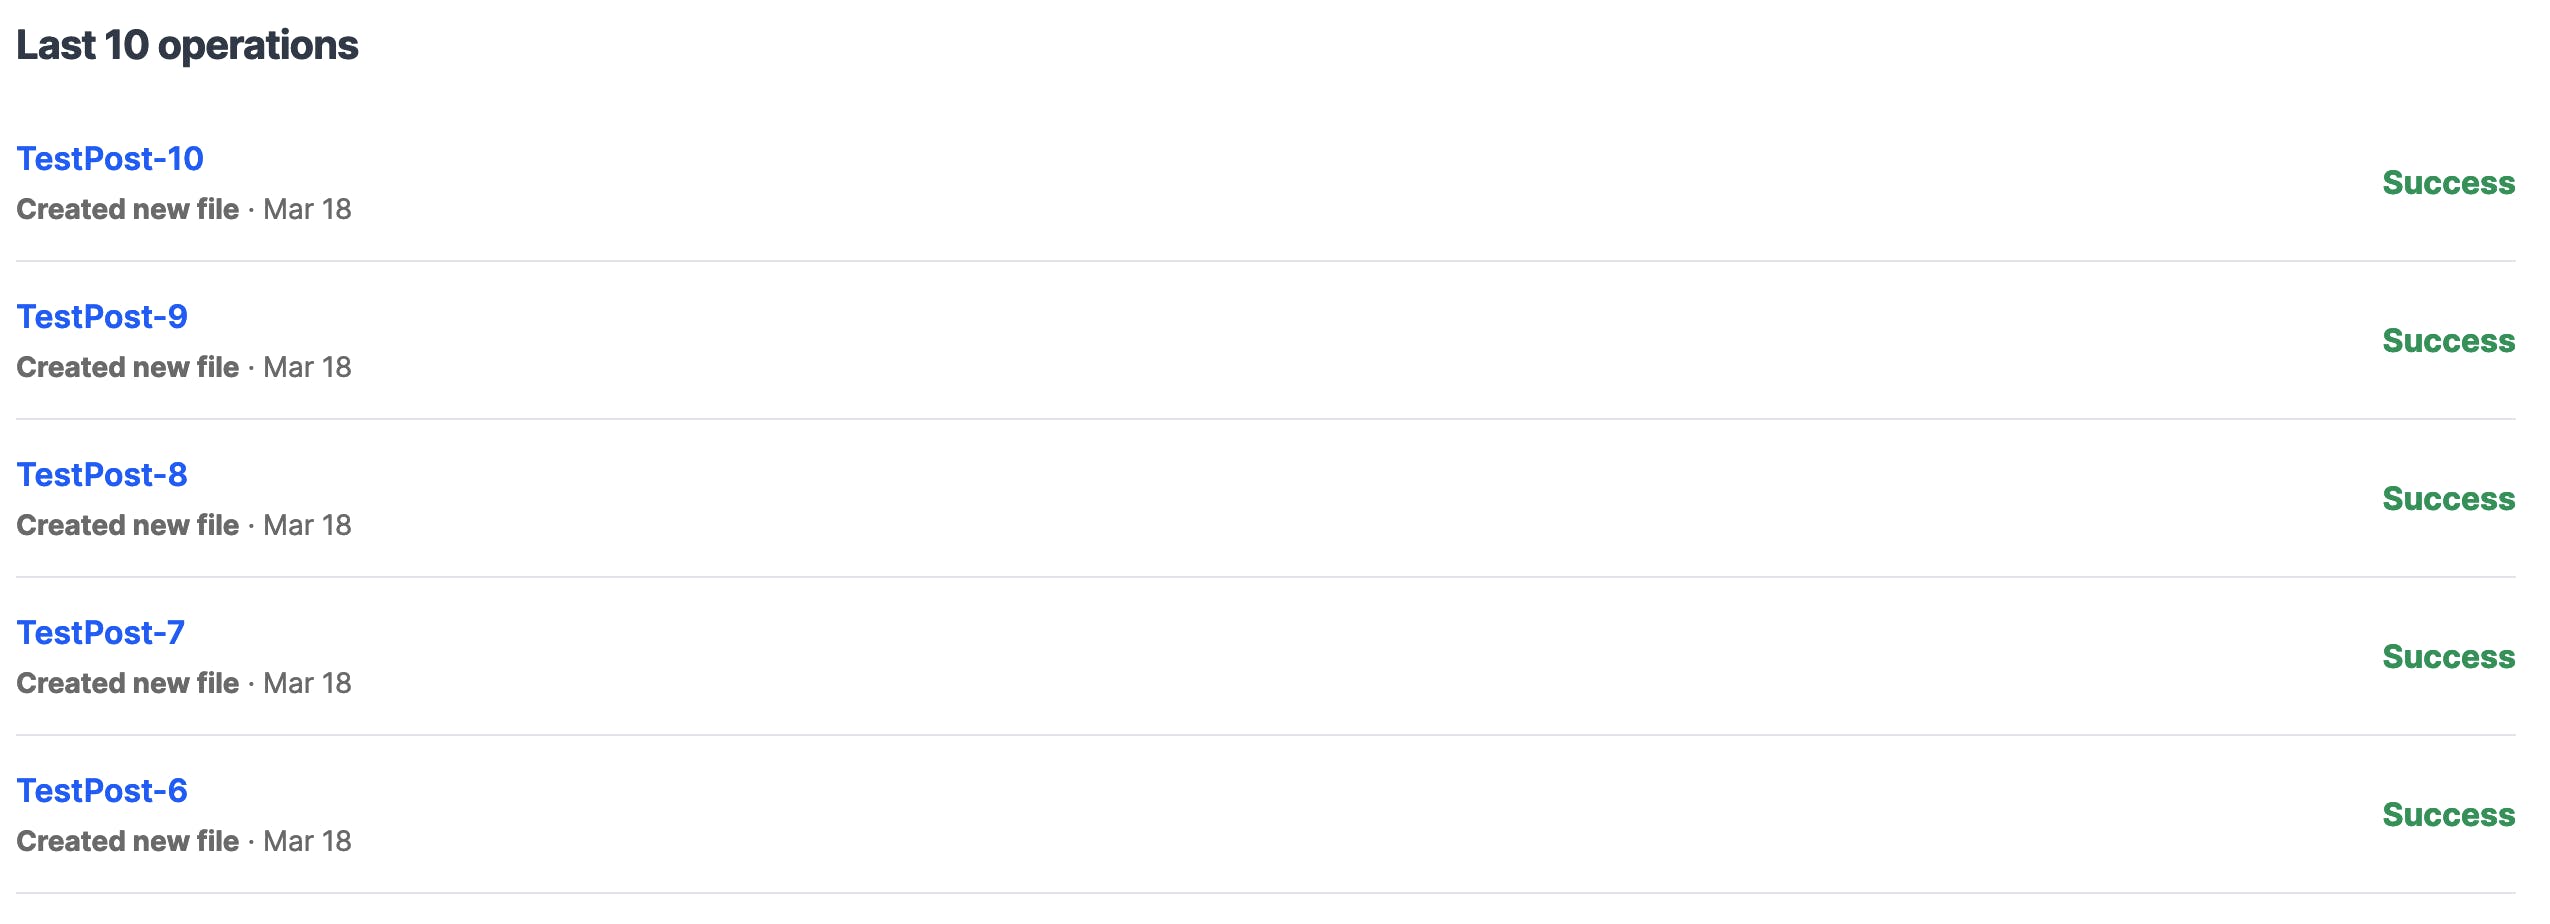
Since MongoDB is our main data store we use this instead of DynamoDB. This will later be used to show users an overview of their current backups and if they were successful or not.
The Implementation
Now, we understand the architecture and why we chose this architecture. Let's go and implement it.
GitHub Authentication
The first thing we need is the GitHub authentication. We've added a GitHub app for that that an user needs to install before starting to backup their posts. We receive an access token for the user which we save securely.
CDK
All services and resources were provisioned with the Cloud-Development Kit (CDK). With the CDK we are able to provision resources and add business logic by using TypeScript
Websocket
Implementing WebSocket APIs with the CDK is not super straightforward. This is mainly due to the lacking support of CDK for Websockets. With the change of version 1 to 2 in CDK AWS removed all experimental packages of the main library. While this is a good thing it also shows that packages like the L2 constructs for CDK are still in alpha.
However, building WebSockets with pure CloudFormation constructs takes a lot of time and tweaking so I decided to use these constructs. To implement WebSockets we need the following packages:
@aws-cdk/aws-apigatewayv2-alpha@aws-cdk/aws-apigatewayv2-integrations-alpha
These packages need to be installed separately.
The Actual API
A WebSocket API has always three main routes:
- Connect -> Handles all connects
- Disconnects -> Handles all disconnects
- Default -> Default route for message sending
For our stateless architecture, we need to save all connection ids and map them to the userId. For that our routes have the following jobs:
- Connection -> Save
connectionIdanduserIdin DynamoDB - Disconnection -> Delete
connectionId - Default -> Send message to
connectionId
The actual API can be deployed with the following constructs:
const webSocketApi = new apigwv2.WebSocketApi(
      this,
      'GithubBackupWebsocket',
      {
        connectRouteOptions: {
          integration: new WebSocketLambdaIntegration(
            'ConnectIntegration',
            websocketHandler
          )
        },
        disconnectRouteOptions: {
          integration: new WebSocketLambdaIntegration(
            'DisconnectIntegration',
            websocketHandler
          )
        },
        defaultRouteOptions: {
          integration: new WebSocketLambdaIntegration(
            'DefaultIntegration',
            websocketHandler
          )
        }
      }
    );
This creates a WebSocket API in API Gateway and connects lambda routes to the connect, disconnect, and default routes.
DynamoDB
DynamoDB was set up really easily. We're just adding a table and a GSI.
    const table = new aws_dynamodb.Table(this, 'WebsocketConnections', {
      partitionKey: {
        name: 'connectionId',
        type: aws_dynamodb.AttributeType.STRING
      }
    });

    table.addGlobalSecondaryIndex({
      indexName: 'byUserId',
      partitionKey: {
        name: 'userId',
        type: aws_dynamodb.AttributeType.STRING
      }
    });
With this, we are then able to query connectionId by userId.
Lambda - Websocket Handler
The last thing we need that our WebSocket works correctly is the lambda function handler. For that, we used the NodeJsFunction construct which bundles all TypeScript code and uploads it.
    const websocketHandler = new NodejsFunction(
      this,
      'websocket-handler-github',
      {
        memorySize: 1024,
        timeout: Duration.seconds(30),
        runtime: Runtime.NODEJS_14_X,
        handler: 'main',
        entry: path.join(`./functions/githubBackup/websocketHandler/index.ts`),
        environment: {
          topicArn: snsTopic.topicArn,
          TABLE_NAME: table.tableName
        }
      }
    );
The actual function is pretty simple. The main tasks really are querying and removing items from DynamoDB. And sending messages to the client.
Sending messages to the client works like that:
- Message comes in with
userId - Get
connectionIdbyuserId - Send message to
connectionIdwith:
const endpoint =
  event.requestContext.domainName + "/" + event.requestContext.stage;
const apiGw = new AWS.ApiGatewayManagementApi({
  apiVersion: "2018-11-29",
  endpoint: endpoint,
});

await apiGw
  .postToConnection({
    ConnectionId: connectionId,
    Data: JSON.stringify(body),
  })
  .promise();
Receiving Websocket Messages
On the other side of the spectrum, we've got the client. The client wants to display a loading indicator in the form of 1/2 Posts are backed up.
For that, we need to establish a connection with the WebSocket as well and persist the state.
This page runs in our legacy repository which is still on JavaScript, Next.JS, and class components. We open the websocket connection in the componentDidMount function and receive all messages in the event listener onMessage. These messages will be saved in the state of React.
async componentDidMount() {
    this.webSocket = new WebSocket(`${githubWebsocketUrl}?userId=${userId}`);
    this.webSocket.onmessage = evt => {
        // Tick all finished posts
    }
}
The code is doing the following things:
- Open a WebSocket connection with the userId as a query param
- When a message is sent, handle the message and update the state
- The message contains the
postIdand sets this post on finish
When the state is changed the loading indicator proceeds.
This is all regarding the actual WebSocket and state handling process. But how is the post backed up now?
GitHub Backup
One thing I've learned the hard way is that GitHub doesn't allow two commits at nearly the same time. This is due to the nature of GitHub and it definitely makes sense. First, I wanted to save all posts at the same time in an async fashion because it would be way faster. But since we are still doing a normal commit we can't do two commits at the same time because they need to have an order. It would be possible to speed it up a bit with an additional plugin for creating multiple files but for now, our solution worked as well.
Which AWS services are included here again?
- SQS -> Passes the
publicationIdto lambda - Lambda -> Gets all posts and backups them
That's it. The process is doing the following:
- Get all posts by
publicationId - Get GitHub Access from the user
- Loop through all posts
- For each post back up to GitHub
The library we are using is Octokit which is the official GitHub SDK.
Summary
And that's it! That is how the whole GitHub procedure works.
Future Work - WebSocket with Request Template
The WebSocket implementation seems very complex at the beginning and there are definitely some moving parts (looking at you, DynamoDB mapping) that are eager to break at some point. Often solutions, where no lambda is involved, are preferred because there are fewer things that can break. And if you don't have any code there is nothing that can go wrong. For API Gateway you can use Request & Response Templates. There are few resources out there for that. However, the implementation in CDK needs to be done completely with CFN constructs and is not really easy to figure out.
Final Words
I hope I could show you a typical example of how we leverage AWS & Serverless to make Hashnode even better! If you're interested in building similar things have a look at our career page we have some really exciting positions open.
If you want to discuss something shoot me a DM on Twitter or comment under the article.