One essential feature of any blogging platform is the ability to schedule posts for publication. Hashnode introduced this functionality in June 2022.
At that time, the entire feature was based on a CRON job. This CRON job managed all various states and published the post. The CRON job was running every minute to ensure that scheduled posts were published.
There were certain cons associated with the CRON job:
Unnecessary computation: The CRON job ran even if no posts were scheduled at that time.
Observability: Each execution of the CRON job produced logs and traces. It was quite hard to understand if and how many posts were scheduled at a certain time.
Error Handling: Error handling was quite hard. If one post failed to be published we couldn't let the whole processing Lambda fail. Alerting needed special functionalities to handle that.
With the launch of EventBridge Scheduler in 2022 we instantly knew that scheduling posts is a perfect use-case for that.
EventBridge Scheduler

EventBridge scheduler is a feature of EventBridge that allows users to schedule tasks at precise times. You can schedule a task that will be executed once at an exact time.
The same targets are supported as for EventBridge, such as:
Lambda
SQS
SNS
Step Functions
... and many more!
Scheduling Posts with EventBridge Scheduler

Let's see how we have implemented the scheduling of posts with the scheduler.
EventBridge Scheduling Basics
Before we worked on any API integrations we first created a few resources we needed to share with our API:
EventBridge Scheduling Group
Lambda Consumer with DLQ (consumer errors)
SQS Dead-Letter-Queue (server-side errors)
IAM Role
EventBridge Scheduling Group
For improving the overview of schedules it is recommended to create schedule groups. It is easier to filter your schedules based on these. We have created one group with the name: SchedulePublishDraft.
new CfnScheduleGroup(this, 'SchedulePublishDraft');
This group needs to be supplied once the schedule is created.
Lambda Consumer

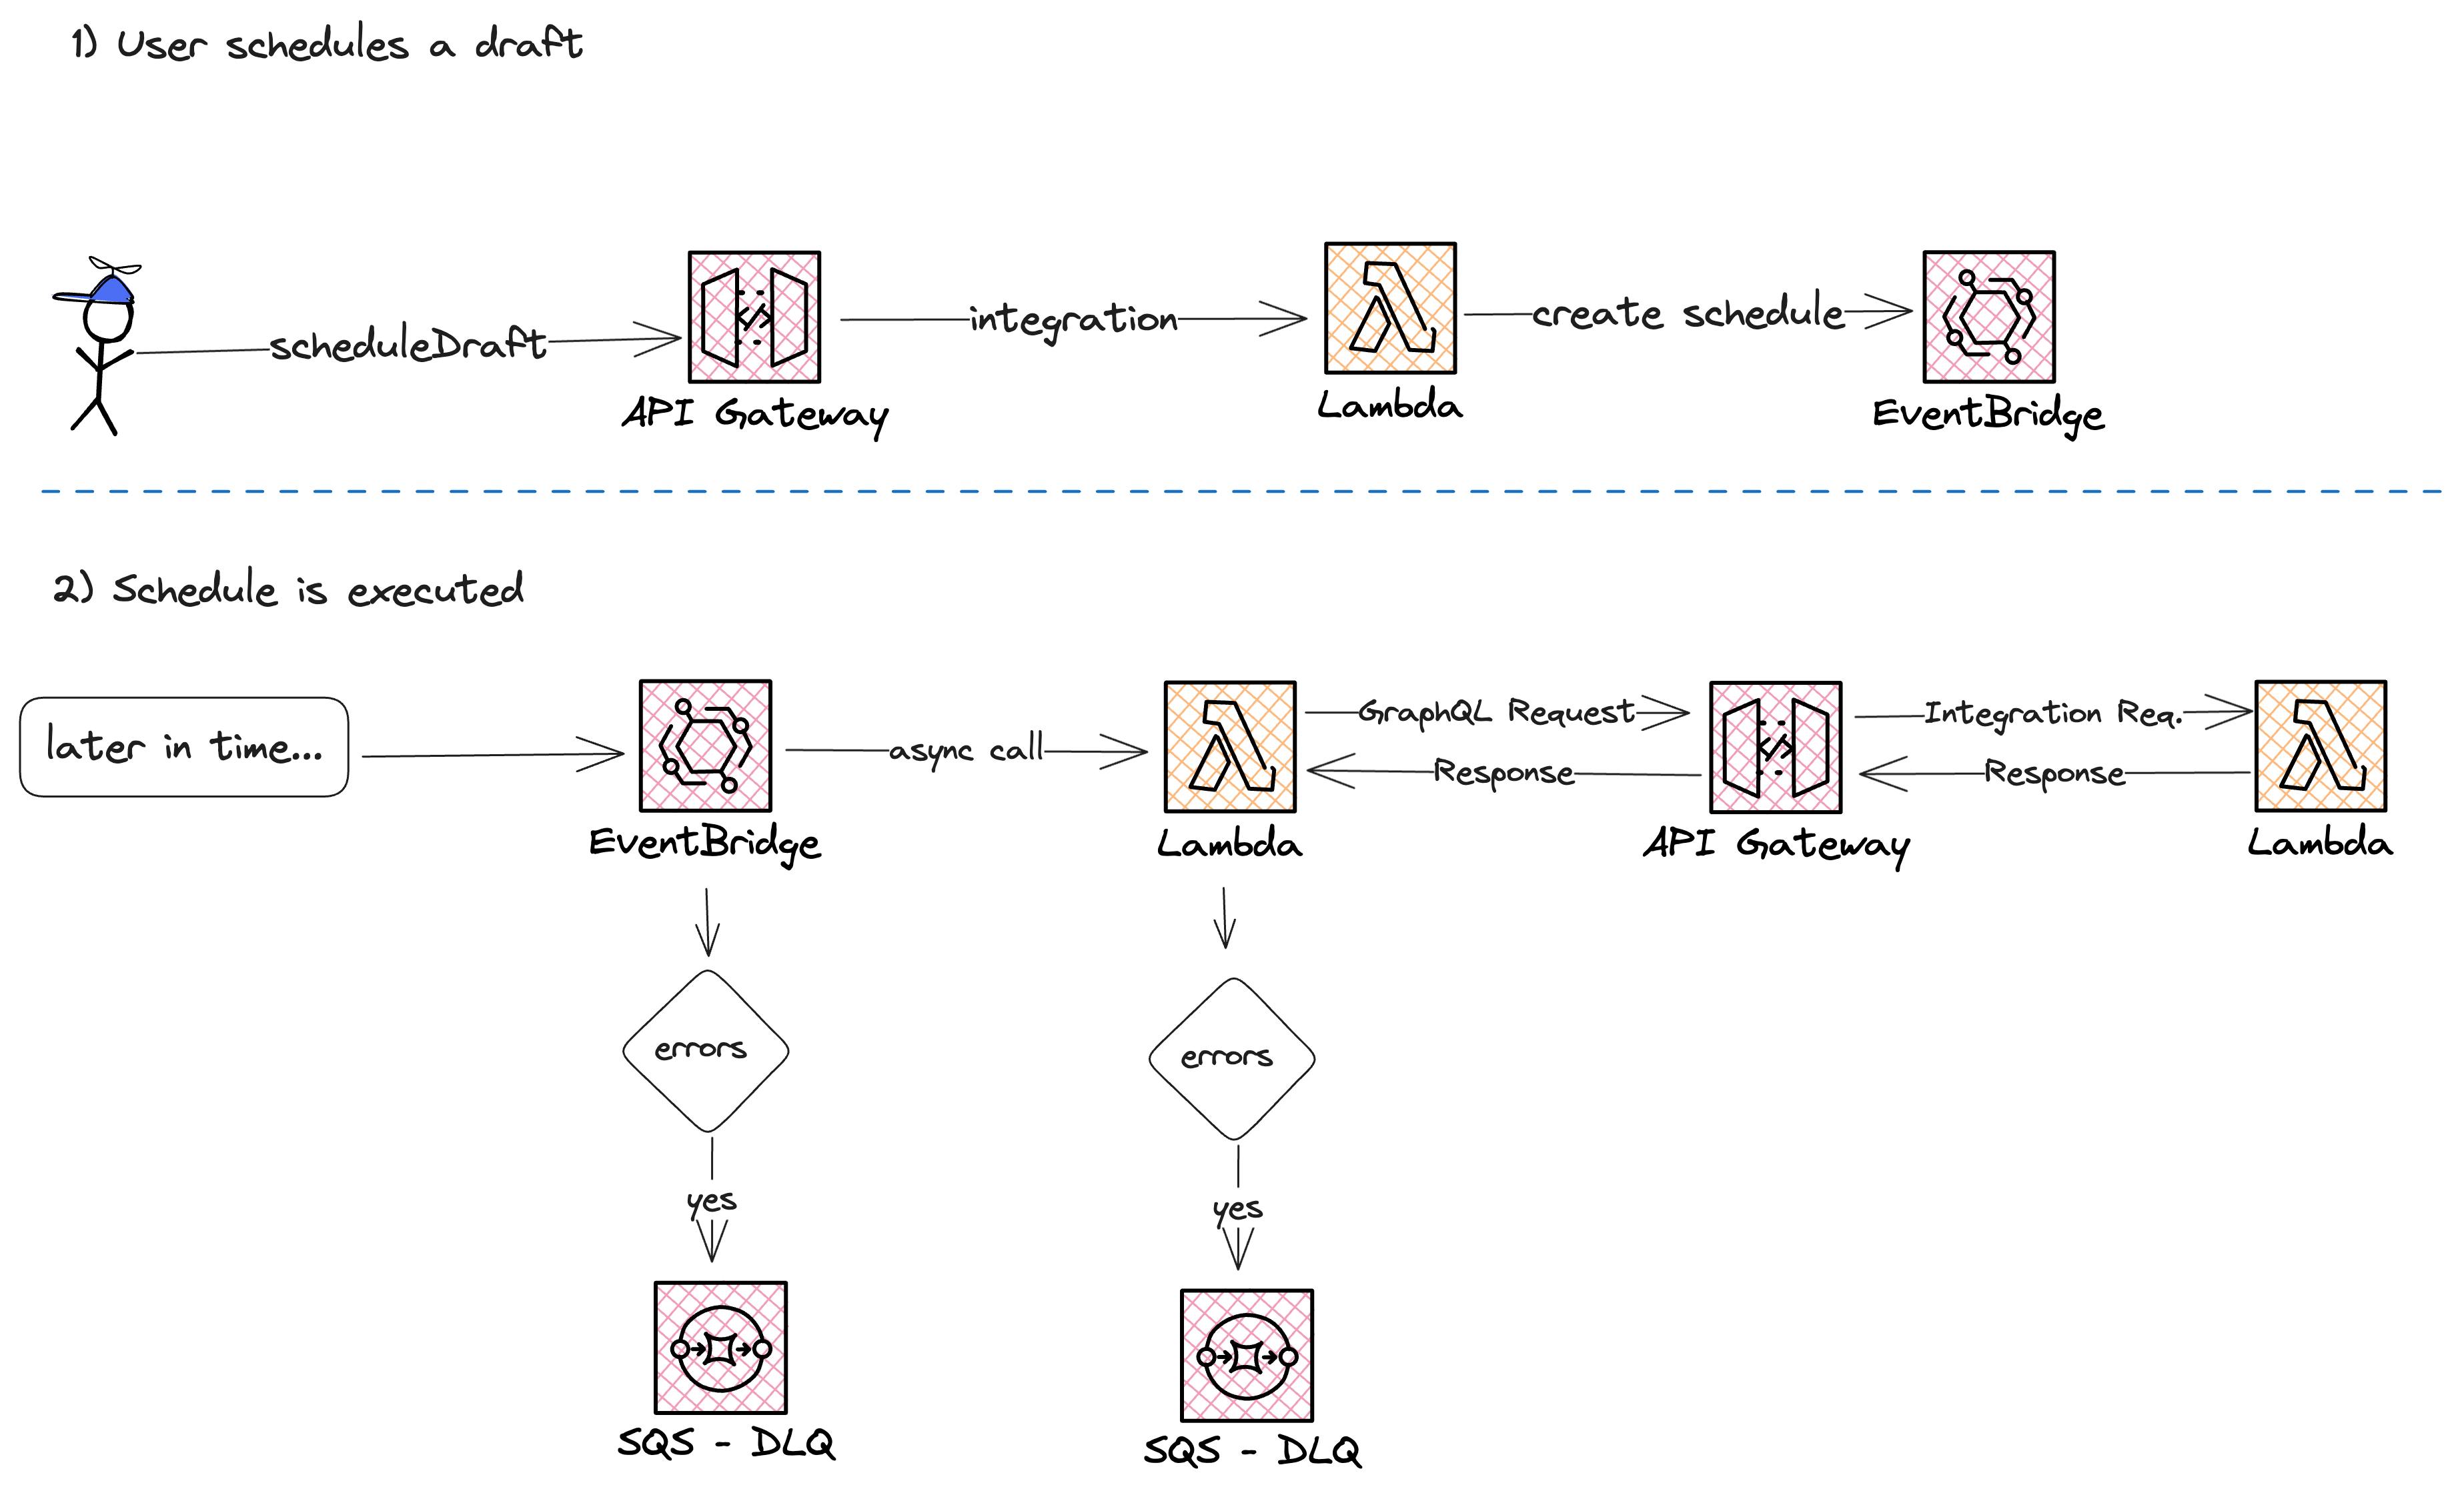
Next, we need a Consumer for our EventBridge Schedule. The schedule is scheduled for a specific time. Once this time is reached a target consumer is called.
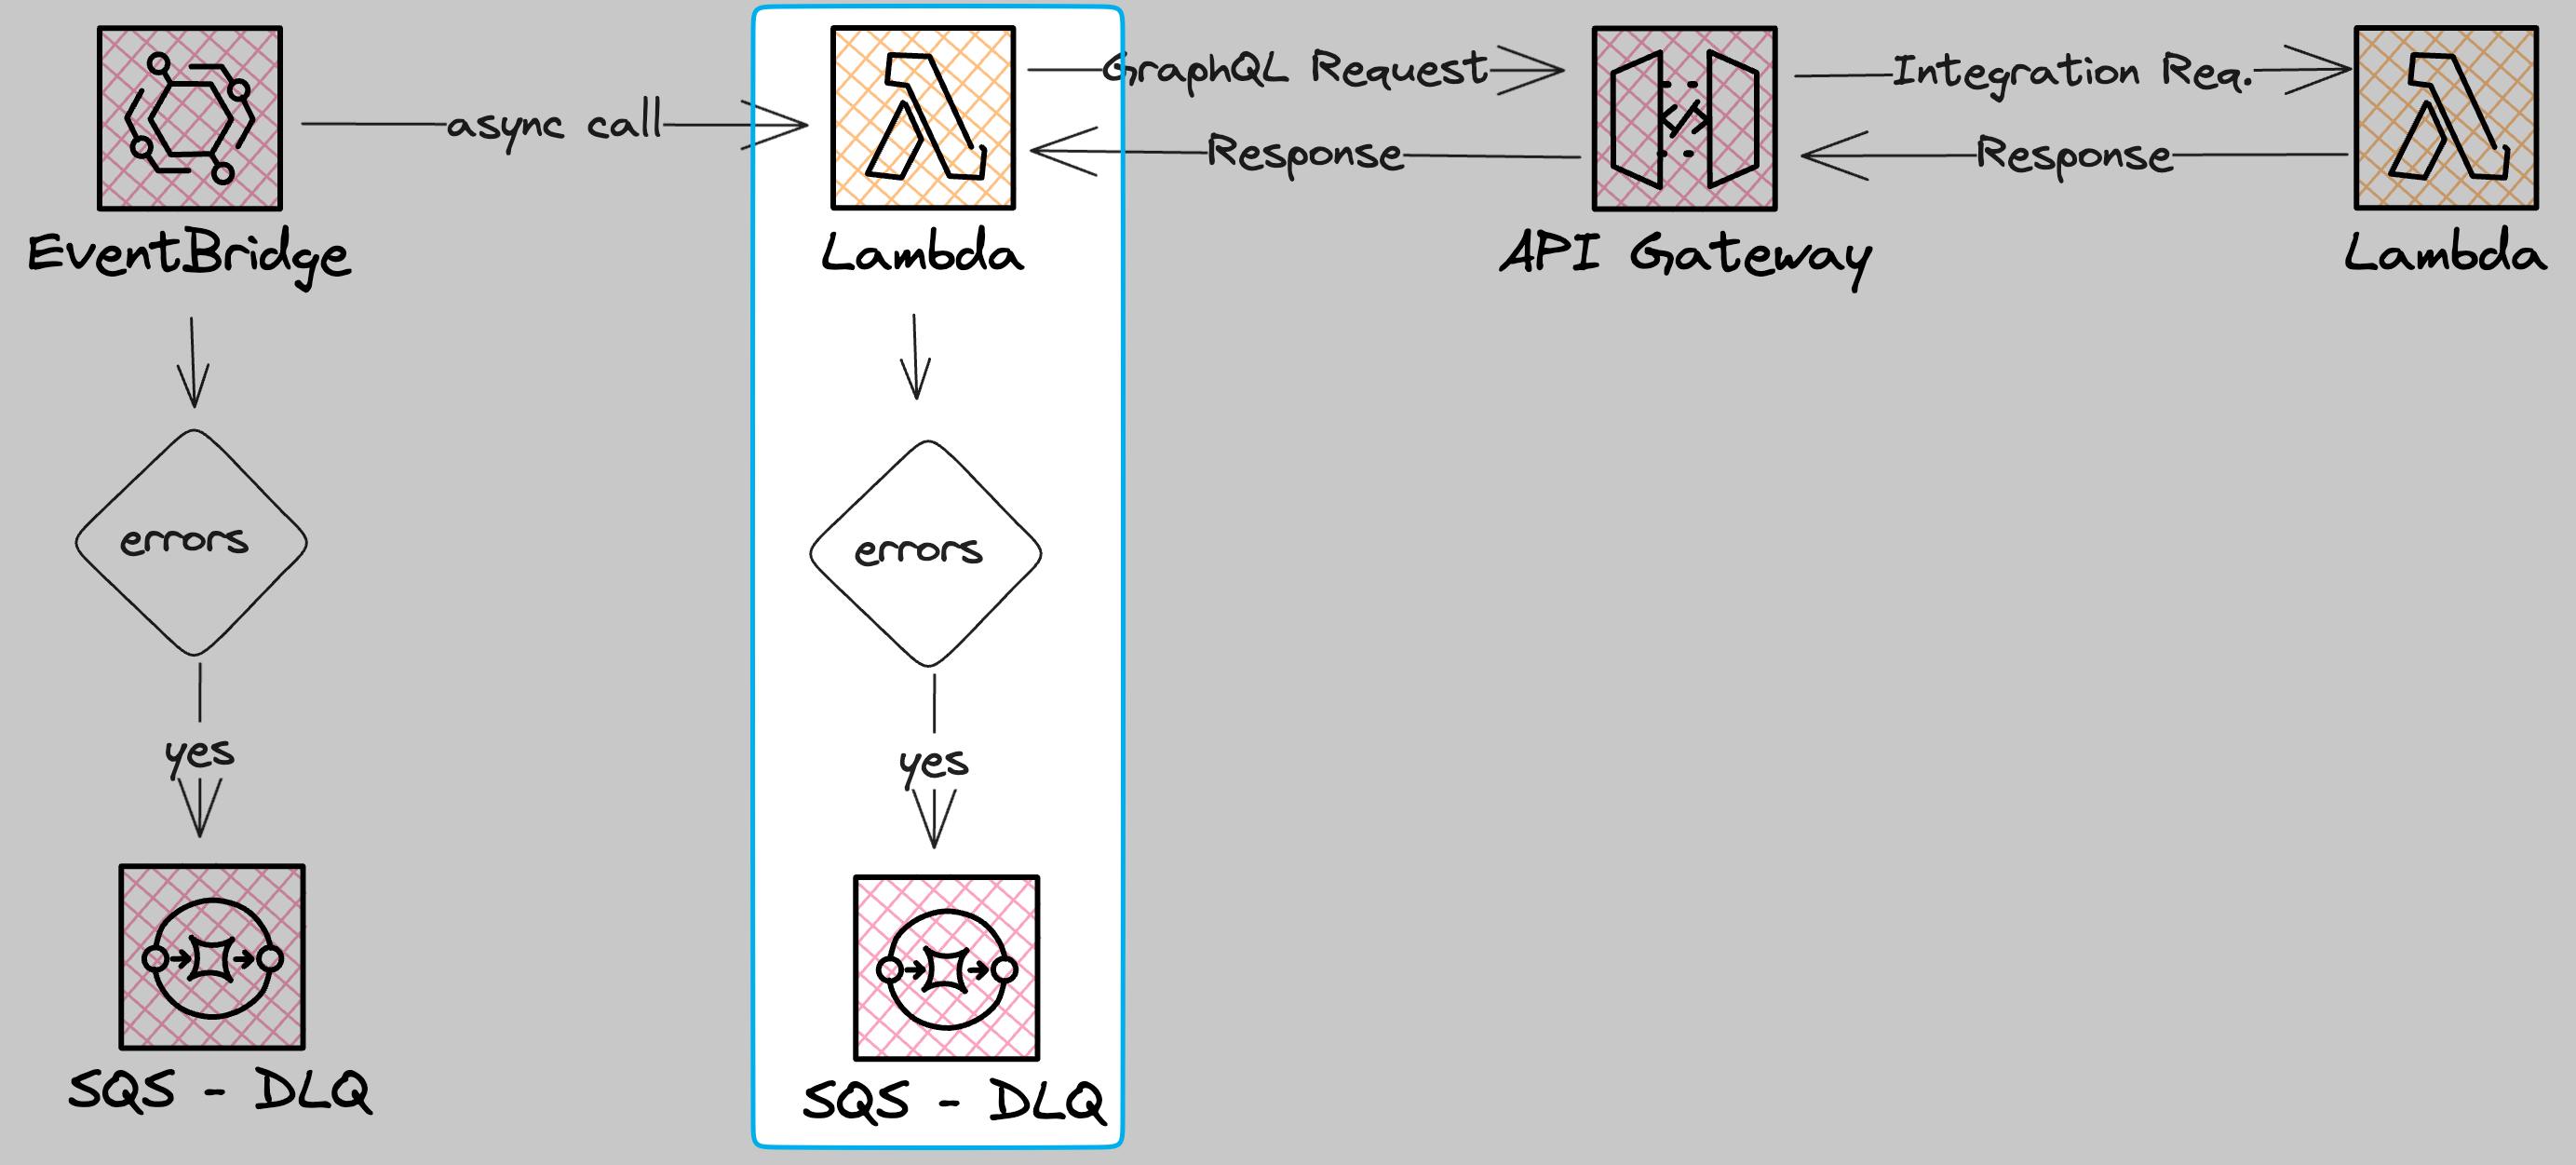
We use AWS Lambda for that. The Lambda function will be called asynchronously. The asynchronous call gives us the ability to use Lambda Destinations. You have two types of Lambda Destinations:
onSuccess: This is called once the Lambda succeedsonFailure: This is called once the Lambda fails
We make use of the onFailure destination. Once the Lambda function encounters some error and fails, we retry the event two times. If it still fails we send it to a Dead-Letter-Queue (DLQ).
The Lambda function executes the business logic (publishing the post, and updating some database states).
Scheduling DLQ (server-side errors)

There is a second DLQ we need to supply in our creation of the EventBridge schedule. This DLQ handles all server-side errors like missing IAM permissions or Lambda API outages.
We now have two DLQs in place:
The first one is for server-side errors. For example: Missing IAM policies or when the Lambda API is down
The second one is for consumer errors. In case the Lambda function fails, the event will be retried two times and after that sent to a DLQ.
In this section, we are talking about the first one. This one is needed to supply while creating the schedule.
We create this DLQ with CDK as well and share it via a parameter:
const dlqScheduler = new MonitoredDeadLetterQueue(this, 'SchedulerDlq');

this.scheduleDeadLetterArn = dlqScheduler.queueArn;

new StringParameter(this, 'EventBridgeSchedulerDLQArn', {
  stringValue: this.scheduleDeadLetterArn,
  parameterName: `/${envName}/infra/schedulePublishDraft/schedulerDeadLetterQueueArn`
});
This gives us the ability to use the parameter in the second API CDK app.
IAM Role
While creating the schedule you need to supply an IAM Role ARN. This role is used for executing the schedule.
This is the CDK code we are using:
this.role = new Role(this, 'RevokeProAccessPublicationRole', {
  assumedBy: new ServicePrincipal('scheduler.amazonaws.com')
});

this.postPublishLambda.grantInvoke(this.role);


new StringParameter(this, 'TargetRoleArn', {
  stringValue: this.role.roleArn,
  parameterName: `/${envName}/infra/schedulePublishDraft/targetRoleArn`
});
We create a role that can be assumed by the scheduler service. We then grant the invoke permissions for one Lambda to this role and save it as a string parameter in SSM.
CRUD Operations
One of the main things we needed to think about is how we want to Create, Update, and Delete the schedules. Hashnode uses a GraphQL API. We have had several mutations for handling schedules already (yes the naming can be quite hard with posts and drafts...):
scheduleDraftreschedulePostcancelScheduledPost
These operations handled the creation of documents in our database. Each of these mutation need to handle the EventBridge schedule CRUD operation.
Schedule Drafts
Scheduling a draft needs to create the EventBridge schedule. We have our own package in our monorepo called @hashnode/scheduling. This package abstracts the calls to EventBridge and allows us to type it more precisely for our needs.
For publishing a draft we only need to call the function schedulePublishDraftScheduler() and everything else is abstracted. The function will
Parse incoming data with
zodCreates the
CreateScheduleCommandSends the command to EventBridge to create the schedule
The create command looks like this:
const command = new CreateScheduleCommand({
  Name: createName({
    draftId
  }),
  GroupName: groupName,
  ScheduleExpression: `at(${formattedDate})`,
  ScheduleExpressionTimezone: 'UTC',
  Target: {
    Arn: targetArn,
    RoleArn: targetRoleArn,
    Input: JSON.stringify(schedulerPayload),
    DeadLetterConfig: {
      Arn: deadLetterArn
    }
  },
  FlexibleTimeWindow: { Mode: 'OFF' },
  ActionAfterCompletion: 'DELETE'
});
The name of each schedule should be unique (no drafts can be scheduled twice). The name follows this pattern:
`SchedulePublishDraft-${draftId.toString()}`
The Target input object shows you all the data we have created before:
Arn:ARN of the Lambda function that executes the business logicRoleArn:The ARN of the RoleDeadLetterConfig.Arn:The ARN of the DLQ for server-side errors
We also set the flag ActionAfterCompletion to DELETE to make sure each schedule is removed after it runs successfully.
Reschedule Drafts & Cancel Schedules
Rescheduling and canceling scheduled drafts follows the same procedure as creating them. In rescheduling, we make sure that the date is valid. We update the schedule.
For canceling schedules we simply remove the schedule from EventBridge.
Results after that
We've deployed everything on production without any issues. A very minimal migration was needed to create schedules for all existing drafts.
Now, if one post publish fails we get alerted immediately with exactly the post that failed.
The development and integration of using EventBridge Schedules for use cases like this are straightforward. The benefits of simplicity we have are immense.
Summary
This post should show you how easy it can be to leverage the managed services of AWS for features like that. The scheduling stack costs 1ct per month at the moment.

One alternative approach for tackling this issue of the CRON job would have been to use SQS and partial batch failures. However, the EventBridge scheduling approach is much more simple. And simple is king.

